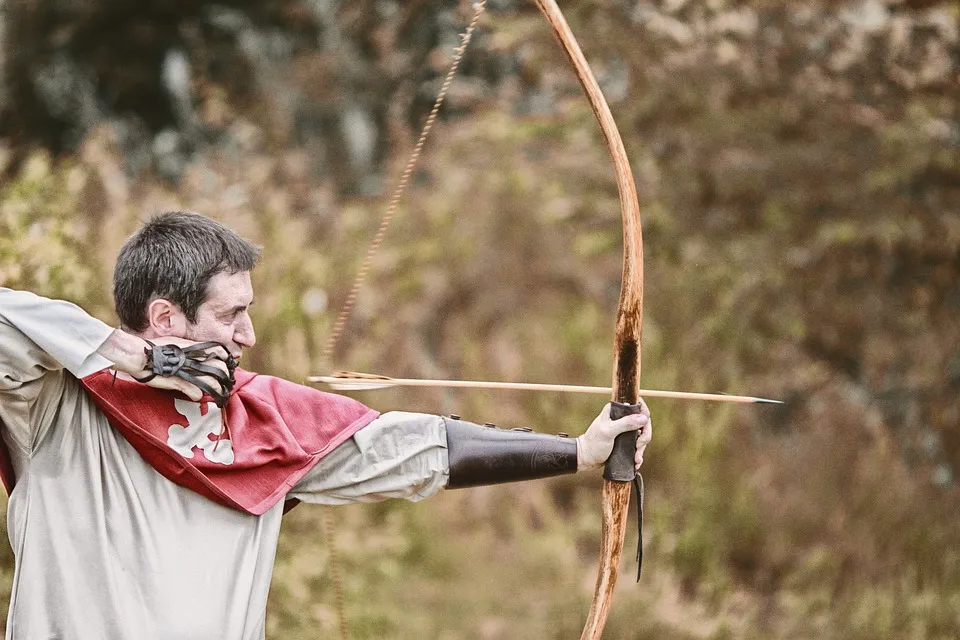
If you think archery is a simple matter of firing arrows from a bow- that’s it, well, think again. To succeed in archery or be a better archer, you need to learn how to carry bows, your archery positioning, etc.
It helps to watch out for different things while practicing archery, like choosing bows and other accessories, but the most important thing to focus on is your stance and body posture while shooting. Stance is just one piece of the puzzle, so be sure to also read our full guide to proper archery form.
As with archery, the correct technique is the key to your continuous improvement. Learning the proper stance and positions would help you achieve many great things in archery.
Having the correct posture allows you to generate the most energy in the most efficient manner, which helps ensure your shots hit.
If you want to check whether your archery skill is good or needs to improve, pick the bow, then close your eyes and shoot the target. If your arrow lands close to the target, then you’re making good progress.
Otherwise, drastic improvements are needed.
There are many shooting stances and postures, but I’m going to describe the best one that helps you improve your skills and doesn’t harm you.
Now let’s move to the steps to make your proper archery stance and positions. Here’s the list of 10 steps that helps you maintain it, and we’ve explained it briefly down.
Step 1: Proper Foot Position
Maintaining proper stance and position starts with the feet. First of all, you all need to have a proper stance to maintain good posture.
Proper positioning of feet allows archers to perfectly create a solid base, firmly draw the bow, and shot accurately.
The basic first rule for archery is placing your foot in the right position because your foot placements help you generate correct energy for the arrows’ accuracy.
The simple rule for doing it’s if you’re a right-handed archer, place your left leg ahead and right leg backward, and if you’re a left-handed archer, then place your right leg ahead and left leg backward of the shooting line.
Always keep your feet at a proper distance because if your stance is too wide, you’ll feel more tension in your legs, and if your stance is too narrow, there will be a lack of stability and accuracy of arrows.
Give your knees an ever so slight bend, and make sure that they’re not locked because that’ll knock off some of your stability and control.
Pay attention to the foot stance and always remember to take the same stance, ensuring that you maintain consistency from the very beginning.
It’s important to maintain the same stance at all times to maximize consistency and make sure your practice is beneficial.
There are generally three different types of stances that you can follow any to which you’re comfortable.
The square stance is the most used stance for beginner learners because it’s easy to practice and helps you start better.
If you’re holding your bow with your right arm, then your left leg will be a little closer, and if you’re holding it with your left arm, then your right leg will be a little closer to the line.
Your feet should be pointing vertically to the target. Make sure your hips and shoulders are on the correct side.
The open stance is similar to the square stance, but you should keep your opposite leg 20-30° turned in an open stance.
An open stance in archery involves placing the feet so that the feet, legs, and hips are facing the target more.
You should first place your right foot on the line with the ball of the foot in line with the gold, then turn your foot a little so that it won’t parallel with the shooting line so far.
The open stance can help improve your bow shoulder stance and alignment when performed in a better way.
If you’re comfortable with the natural stance and want more accuracy and comfort, then a closed stance would help you.
The closed stance is generally the same as the open stance. However, it’s normally used with a much smaller angle to the shooting line than the open stance.
The main issue with the closed stance is that most of your shoulder alignment is already done, making it difficult to retain the draw side connection through the set.
Step 2: Lower Back and Hips
After your feet are properly positioned, you should be sure not to twist your hips ahead or out of the target side.
Your hips should be comfortable with your feet to maintain your body’s proper standing - so you may shoot with fewer difficulties.
A good way to get a feeling of fixing yourself to the ground with your posture is to stand in the shooting line in an open stance and have your hips steady. Your hips should be facing forward.
While shooting, if your bum muscles tighten and come together, that means your body is getting good energy, and shooting will be much larger and accurate.
To protect your lower back from any types of injuries all the time, you need to enhance your archery posture, stabilize knees, and hip joints.
Grabbing or extending the gluteus muscles will help you to roll your hips under your body where it should be and make you more stable for the proper focus.
Step 3: Waist And Core
The core will contract or relax when you draw the bow, but doing it unnaturally or slowly will give you irresponsible or bad results.
You must then make sure that your core is engaged before lifting the bow. This will help maintain your stability, posture, and shoulder positioning.
The leg rotation and glute attention greatly help for the best shooting targets, so remember it should be properly done.
From those stages, you should feel as if your center of mass is low down, and engaging the core should reinforce that.
For immersing the core, slightly pull your stomach in and focus on making the area just below your belly button tense. The sensation is similar to preparing to be punched in the stomach.
This stage can be physically heavy, but it strongly helps your archery and maintains the core engagement through the whole shot. Strengthening your core with targeted archery exercises will make holding this position much easier over time.
For the best archery result, the recurve archer should understand the difference between correct posture and incorrect one.
The archer should know how the back is maintained and if the core is positioned incorrectly.
Your body’s whole weight should be allocated to the feet’s heels, and the whole shooting posture should look properly aligned.
The center of your body’s mass will feel much lower when you’ve the correct posture, and you can see how much better the archer looks when the posture is done correctly.
This strength and power from the correct posture and stance will translate directly into the rest of your recurve archery.
Step 4: Back
While drawing the bow back takes most of the shots, it’s the most important muscle group you use for archery.
It helps to provide stability & balance, and it’s the main muscle group that you can use to pull back the bow’s string.
When you’re drawing the bow, you should keep your back in a straight position, keep your elbow in line with your shoulder, and you’ll be able to engage back muscles in that position.
Step 5: Chest
Any type of unnecessary tension would reflect in your chest. There are two ways of keeping your chest area in a good position.
First one, keep your chest in a straight and uplifted position. While breathing air in and lifting your chest, you can get some muscle support from your pectoral muscle while drawing the bow.
For the second one, drop your chest. When you reduce the chest size by breathing out, your chest will drop automatically.
Doing this will allow the string better clearance and reduce its chances of hitting your clothes or body parts upon arrow release.
Your upper body should be firmly straight with your chest as well as shoulders in the same position. You should be able to feel the engagement of the lower part of your shoulders.
That helps for the easy expansion, and you’ll have a quicker and cleaned release. This will increase strength and staves off from a high chest.
Step 6: Bow Arm
The arm that’s holding the bow should be in a straight and not bent position should be in the same position until the release.
You shouldn’t fully lock out the elbow, mainly if you’ve overly bendy joints that may cause your elbow to jut out, and it may get in the way of the bowstring.
The bent arm isn’t as strong as a straight arm, and it doesn’t give you consistency while drawing the length.
The archer’s bow arm should be in a straight position, not bent. If you bend your bow arm, you won’t remain consistent in your position.
You need both good bone and muscle support to use your bow.
Stronger bones and muscles will improve your shot consistency.
Your bow arm is your left arm for right-handed archers, and keep it straight, not bent, but don’t lock it.
A locked bow arm may hyperextend, which can cause issues, such as the bowstring slapping your elbow or forearm.
Meanwhile, a bent bow arm reduces the arm’s overall strength and makes it difficult for archers to maintain equal muscle tension on both sides of the elbow, which hampers consistency.
Apply a little tension to the bowstring and rotate your elbow a little away from the string in a clockwise direction for the right-handed archers - and the opposite for the left-handed archers.
It helps to set your bow arm into a strong position keeping the bowstring away from your elbow.
The shoulders should create a bone on the bone connection in your bow arms shoulder, and it properly maintains your drawing arms shoulder for quick and productive drawing.
Step 7: Shoulder position
This is the most important step for maintaining a proper archery stance and posture and the step where most of the archers fail.
If your shoulder is raising, moving back, or going down, then there’s a high chance of losing your accuracy while shooting the arrow, and it can put more stress on the different parts of the body and cause common archery injuries.
You should be released and calmed down to get the maximum result in accuracy and shot perfections.
Proper shoulder position plays a big role in keeping your archery shots aligned correctly.
The shoulder on your release arm should be fallen properly once your elbow and lower body parts are properly positioned.
Many archers make mistakes in shoulder positions. The bow arm shoulder or beginning shoulder should be relaxed and in a natural position.
The archers’ shoulders must be parallel to the ground and should be kept as low as possible to get good bone on bone contact for reducing injuries by removing stress from your shoulder, and arrow shots will be larger.
The best way of testing your shoulder position is by standing in front of the mirror and raising both hands on the drawing position, and keeping a close eye on your hands’ positioning.
Keep your shoulder and bow arm as much as in a straight line position because the bending of your shoulders back can cause poundage lengthening and makes it difficult to get the shot.
Step 8: Head position
Head positioning is a simple but important step in maintaining correct posture while shooting because your head position helps in the proper focus while shooting.
Focus is key for any shot.
Your first step should be looking straight ahead along with the shooting line with your head level.
While looking straight into your target, you should let your muscles around the neck and the upper shoulder loosened.
You should experiment in different ways to get the best head positions, like practicing arrow release with different head positions and get the best head position in which you’re most comfortable and getting maximum results.
Remember to keep your head straight up, look towards the target, start shooting, don’t distract yourself with anything. Just focus on your target.
If you’re distracting from any substances near the target, you can also use sunglasses to do proper shoot practice.
If you rotate your head and shake your hands while standing with a bow in your hands, there are maximum chances of your target failures.
For maintaining your head in a correct position, you can practice with the glass of water in your head. It will show you your head is tilting or not, and it’s recommended to practice until and unless you get your head in a stable position.
While drawing a bow, keeping the glass on your head indicates you most likely have a good head position.
Step 9: Anchor Point
The place on your face where you bring the bowstring and your drawing hand is called an anchor point.
Mainly the anchor point has three contract points, they’re string touching the corner of your mouth, string pressing the tip of your nose, and the peep sight aligns with your sight housing.
Consistency depends upon the contact points you’ve. One of your anchor points should make a bone-on-bone connection, such as your thumb bone clasping against your jaw bone.
Always make sure that you’re entering your aim with your bow’s touch to the same point on your face every time.
Step 10: Weight Distribution and Leaning
Last but not least, while drawing the bow or standing with your bow in the hands, most of the body weight should be distributed to the feet for a better target.
The archer should be straight for a good stance, so there are four different directions an archer can have a degree of freedom to move, they’re towards the target, away from the target, forward, and backward.
In towards the target, you’ll have to put your equal load on both of your feet.
For forward or backward lean, you can put 65% of your body weight on the feet toes and the remaining 35% on the heels of your feet.
If you’re putting more weight on your front foot, you’ll be leaning towards the target, and vice-versa and if you’re laying more load on your toes, you’ll be leaning forward, and vice versa.
So when you’re standing with the bow in your hands, your feet are parallel, your knees are bent, your hips are relaxed and loosened, shoulders are down and parallel to the ground, and you’re looking straight at your target.
If you’re doing good and face problems again, practice from the beginning until you’ll do it great.
In archery, your focus is the most important thing to keep in mind. Get all steps correctly, and start focusing on your targets.
That’s how you can be led towards perfection in archery.
Frequently Asked Questions
The square stance is the easiest starting point for beginners. Place both feet evenly on either side of the shooting line with your body perpendicular to the target. It's simple to replicate and gives you a stable foundation while you develop your form.
Your feet should be roughly shoulder-width apart or slightly wider. Too wide of a stance creates excess tension in your legs, while too narrow of a stance reduces stability. Find a comfortable width that lets you stay balanced without straining.
Consciously push your bow shoulder down before and during the draw. Engaging your back muscles and keeping your chest relaxed will help prevent the shoulder from creeping up. Practicing in front of a mirror can help you spot and correct this common mistake.
Final Thoughts
Your stance and posture form the foundation of every shot you take. Getting your foot position, core engagement, and shoulder alignment right will improve your accuracy more than any piece of gear ever could.
Practice these 10 steps consistently, and you'll build the muscle memory needed for repeatable, accurate shots every time you step up to the line.


